TLDR; I rewrote Ensembles — my 13-year-old Objective-C sync framework — in Swift 6, using Claude Code. It now supports SwiftData, has new backends, and is in public beta.
Way back in 2013, I was trying to ship cloud sync in a predecessor to Studies app. I’d been using Apple’s iCloud Core Data sync, and it was a disaster. Data corrupted silently. Devices diverged and never recovered. I spent more time debugging Apple’s sync than building the app.
So I what any level-headed developer would do — I reverse engineered it. I dug into what Apple was doing under the hood, figured out the design problems, and built my own replacement. I called it Ensembles, and pushed it to GitHub at GOTO Aarhus later that year.
The core idea behind Ensembles is that sync doesn’t need a central server. Each device keeps its own copy of the Core Data store. The framework watches your saves, generates compact change logs, and when changes arrive from another device, it merges them in. There’s no server that understands your data model. No hosting costs. Each device is an equal peer.
In 2013, nobody had a word for this. It was just “sync.” I released an open source version of Ensembles, and a little later a more capable commercial version called Ensembles 2, with CloudKit support, better memory usage, and additional backends.
More recently, the web community has started to embrace this approach and given it a name: local-first. I attended the inaugural Local-First Conf in Berlin in 2024, and gave a short talk about my journey with Ensembles — at that point more than 10 years old. It was good to see so much energy around ideas that some of us had relied on for a long time. And it’s great having a word for it; it means you can talk about it, have a conference about it, and push the idea forward.
An old framework in a new world
The original Ensembles was written in Objective-C. It worked with Core Data. The code was solid and I was still maintaining it, but the world had moved on. Apple introduced SwiftData. The community adopted Swift 6 with strict concurrency. Nobody starts a new Objective-C project in 2026.
I was expecting a long, slow decline. Keep it compiling, fix the odd issue, watch it fade out.
What if?
Then about a week ago, I had an idea: what if I used Claude Code to rewrite Ensembles in Swift 6?
Not a wrapper around the old code. A real rewrite — async/await, Sendable types, structured concurrency. And while I was at it, add some new backends. Maybe even try SwiftData support alongside Core Data.
A week later
Within a day, the core Swift rewrite was compiling and passing tests. I directed Claude Code throughout — correcting mistakes, steering it away from bad decisions. It made plenty of them. But the Ensembles architecture mapped reasonably well to Swift, which helped.
One thing that made this feasible: Ensembles had extensive tests. Without those, I wouldn’t have attempted it. When you’re rewriting a sync framework — where bugs mean data loss — you need to know things actually work. The tests were the safety net. Claude Code would produce Swift code, the tests would catch problems, and I’d fix things up. Without that feedback loop, this would have been reckless.
By the second day, I was adding backends. Then SwiftData support came together. The rest of the week was cleanup — licensing, documentation, more tests — and now Ensembles 3 is in beta.
What Ensembles 3 is
For anyone who hasn’t used the original: Ensembles is a peer-to-peer sync framework for Apple platforms. You add it to your app, point it at your Core Data or SwiftData store, choose a backend, and your data syncs across devices. No server development. No vendor lock-in.
The architecture hasn’t changed. What’s new:
Pure Swift 6, with structured concurrency support
SwiftData support, alongside Core Data
More backends than before
Same decentralized, local-first architecture — no central server required
The AI in the room
I know a lot of people are angry about LLMs, and with good reason. I wrote a bleak post in January about what they’re doing to our industry. I stand by that.
But this rewrite would have taken months on my own. I wasn’t going to do that. Ensembles was heading for a quiet retirement. Now it isn’t.
I don’t want to overstate it. I made every architectural decision. I know the Ensembles codebase inside out — I designed it. Claude Code handled the mechanical translation, but it needed constant correction. This isn’t a story about AI replacing a developer. It’s more mundane than that: a tool that sped up a particular kind of grunt work.
I’m not going to tell anyone how to feel about that. But in this case, the result is a framework that wouldn’t exist otherwise.
Give it a try
Ensembles 3 is on GitHub. It’s a beta, so expect rough edges. If you have a Core Data or SwiftData app and want local-first sync without running a server, take a look.
This post is the result of a lot of thinking. It’s not very uplifting, but it is where I am right now.
It is presented in two versions: the first is written entirely by yours truly, and the second is constructed from the same ideas, as written by an LLM.
Why? No idea. Just seemed like an interesting experiment.
Drew McCormack
I’ve been more depressed in the last two months than at any time I can remember. Sure, it was triggered by Trump, but it’s bigger than that…
It feels like Democracy is failing. It started with the 2016 election, but a lot of us were not really paying attention, and just thought of it as an odd detour in history.
Early days
It wasn’t. The Russians and others discovered something important: you can program social media like you can program a machine.
It’s as close as you can get to mind control: Feed them lies. Feed them the truth. Feed them things they like. Feed them things they hate. Measure, optimize, rinse and repeat. You can literally calibrate a society to your goals!
Those were the early days, when you still needed software developers to write the code for the bots, and people to setup fake accounts. LLMs have made that ancient history.
Where we are at
Today’s machine is much more advanced. It can manipulate voters to swing elections, and — in a bizarre non-linear way — it can even alter the social media networks themselves through political pressure.
And you don’t need AGI (Artificial General Intelligence) to do it. The current state of the art is sufficient. Hybrid intelligence. The bionic brain. A human enhanced by an LLM.
An LLM buddy
I’m not just spouting hatred about something I have no experience with. I’ve spent the last few months working almost exclusively with LLMs.
Working with an LLM as a programmer is an entirely different experience to programming alone.
For example, I just spent a day building quite a powerful tool with Python. I must have only written about 10 lines of Python in the last 20 years, and I didn’t need to write a single line for this project. And yet, there it is; the tool; doing what I wanted it to do.
The LLM didn’t do it alone either. I didn’t just leave it with a single instruction and go home for the day — I guided it every step of the way.
Sometimes it did stupid stuff, like a student wet under the ears, but I told it so, and it did better. Occasionally it would take 5-6 attempts to get it to produce something that I was satisfied with.
But the net result is astonishing. There is no doubt. I would never have made a tool like this before the advent of LLMs.
Old way, new way
It is not that I couldn’t have figured it out on my own; there was nothing there that was beyond my intellect.
There were many practical details which I did not have knowledge of, but a few years back, with Google in hand, I could have slowly unpicked the problem. I think it would have taken me at least a week. Instead, I finished it in around 6 hours.
So though I could have built this tool before, it is very unlikely I would have. I would have needed a very good reason to spend a week doing it. As it is, the tool is quite frivolous, so I would never have even started.
Now I can build frivolous tools at will!
Changing industries
So it is going to change everything in my industry, and likely in many others. And that raises questions. To begin with, Do I still want to work in this “new” job?
I don’t know. It is exhilarating in some ways to tell something to do something, and then minutes later have it done, and work as envisaged.
On the other hand, it definitely feels less valuable. Like being the operator of a furniture making robot instead of a skilled carpenter. It’s a completely different job — you need the understanding of a carpenter, but not the skills.
Changing societies
But changing jobs is not what worries me the most. That has overcome many industries before (including furniture making carpentry!). It’s painful for the afflicted group, but people generally move on and find something else to do.
I don’t think it will be like that this time. For a start, there may not be much to move on to. AI will advance, and even if it is not “intelligent” in itself, it will be able to take over a lot of tasks.
Utopia
So we can all retire and enjoy great lives, right?!
I wish I was that optimistic.
Social media gave Trump the win in 2016, and it introduced the programmable society. Things have advanced quickly, and your opinion is now being constantly manipulated. Human beings have not evolved to handle this.
I’m worried for democracy. It’s a great system when people are left to make up their own minds, but democracy is fast becoming a programmable machine. People are too easily manipulated. We see it in the US, but equally in virtually every democratic society on Earth. The combination of AI with the syringe of social media is lethal.
(Ironically, less “free” countries like China may end up doing better, because if their leaders see the threat, they can quite easily enforce a new direction. In a democracy, bad players can hijack the state for their own benefit.)
Depressed
So I’m depressed. I’ve already lost friends over this: I just can’t talk to them anymore, the political divide has opened so wide.
Sooner or later I will have lost a job, and I’m not sure I want the one that comes next.
But most of all, we’re fast losing our freedom. I’m not even American, but I feel it from here in Europe. It feels like we have all lost.
Too late?
Can it be stopped? Part of me hopes people will just wake up to it. Some already have, leaving social media for Mastodon, or whatever.
But these tend to be a minority who grasp the situation, and the majority probably don’t have the insight to deal with it at this point. They are just drowning in the pace of change. Perhaps people will adapt in time. Let’s hope.
An AI Vaccine?
I also wonder if AI itself might not end up providing a remedy. The world has always been afflicted by new challenges, from malware to Corona virus. Human’s usually come up with the antidote.
Maybe the remedy here is software that is looking over your shoulder, seeing your screen, and warning you when it is manipulative. Software fighting software. A junk mail folder for the world.
Common Sense
I want to believe people can pull themselves out of this. I don’t want to live in a George Orwell novel. (How prescient was that guy?!)
As it is, I don’t trust our governments, and I don’t trust our companies. And my job keeps me awake at night.
I’m at loggerheads with myself.
How are things with you?
An LLM Version
I’ve been depressed. A lot. It started with Trump, but it’s not about Trump. It’s about watching democracy fail in slow motion. The cracks began in 2016—Russian hacking, the weaponization of social media, the realization that we’d built a machine that could be programmed to manipulate minds. Feed people lies. Feed them truth. Feed them what they love, what they hate. Measure their reactions. Optimize. Repeat. These were the early days of the machine, a crude prototype fueled by rage and algorithms.
Now, it’s nearly complete.
I’m not even worried about AGI—artificial general intelligence. That’s a fairy tale, or a nightmare, depending on who you ask. If it’s real, we’re probably doomed anyway. What scares me is the hybrid: the bionic brain. Humans working with AI, refining manipulation into an art form.
I’ve spent the last few months working almost exclusively with AI. And it’s left me hollow.
Here’s an example: I built a powerful Python tool recently. Not a single line of code came from me. The LLM didn’t do it alone, either. I guided it, step by step, like a teacher correcting a clueless student. It made stupid mistakes. I called them out. Five, six attempts later, it spit out something usable. The result? Astounding. A tool I’d never have built before. Not because I couldn’t understand it—there’s nothing here beyond my intellect. But the practical details? The time? A week of Googling, debugging, rage-quitting. I don’t have a week to waste on “frivolous” tools anymore.
This changes everything. Not just programming. Every industry.
Is this still my job? Sometimes it’s exhilarating—watching an idea materialize in minutes. But it feels… cheap. Like replacing a carpenter with a furniture-making robot. You need the mind of a craftsman, but not the hands. The value’s gone.
But displacement isn’t the worst of it. We’ve survived automation before. People adapt. This time? There might not be anything left to adapt to. AI doesn’t need consciousness to take over tasks. And while we’re arguing about UBI and early retirement, the real crisis is unfolding elsewhere.
Democracy is a machine now, too. Programmable.
Social media gave us Trump. It proved you could hack human minds at scale. Now, imagine that power refined by AI—opinions shaped in real time, fears and desires micro-targeted, truths and lies indistinguishable. We haven’t evolved to handle this. Neither has democracy. It relies on people making their own choices. What happens when those choices aren’t theirs anymore?
The U.S. is crumbling, but it’s not alone. Authoritarian regimes might fare better. China’s leaders can pivot overnight if they sense threat. In democracies? Bad actors hijack the system. And they have.
I’ve lost friends over this. The political divide isn’t just wide—it’s algorithmic. We’re living in different realities. I’ll probably lose my job next, or morph into something I don’t recognize. But more than anything, I’ve lost the illusion of freedom.
Can it be stopped? Maybe if people wake up. Some flee to Mastodon or shun social media entirely. But that’s a privileged few. The rest don’t have the tools, or the will. Maybe AI will save us—software fighting software, a spam filter for reality. Or maybe we’ll just… surrender.
I don’t trust governments. I don’t trust corporations. My job—this strange, soulless collaboration with machines—keeps me awake at night. Orwell saw it coming. I just never thought I’d live it.
TLDR; I’m launching a new Swift framework called Forked for working with shared data, both on a single device, and across many.
A few years ago, I was knee-deep developing the collaboration feature of our app Agenda. Agenda is mostly local-first, so it was a challenge. Effectively, Agenda is a decentralized system, and the collaboration feature would allow anyone in a group to edit a shared note at any time — even when they were offline for days. When each copy of a shared note was transferred over to the devices of other members of the group, the result had to be consistent. It would be unacceptable for two people to end up with different versions.
I mentioned that Agenda is a local-first app. That means there is no central server with any understanding of the data model, taking care of conflicts — there is no central truth. Each Agenda client app has to take the data it gets from the cloud, make sense of it, and merge it in such a way that the result is the same as what other devices end up with, even if the data in question is days old.
What I realized back then is that this problem has already been solved very elegantly by a product that is extremely well-known and popular, and right under our noses. It’s called Git.
If you treat each copy of the Agenda data as something akin to the latest commit in the branch of a Git repository, you can use the same approach as Git to merging data. And Git works: developers can go hiking in Alaska, develop code completely offline, come back and merge their changes, and all is good with the world.
Back to Agenda: I decided the solution was a class called BranchedFile. My goals at the time were to create a simplified, embedded version of Git, that would operate on a single file. It would support branching, with main and auxiliary branches that could be used to handle concurrent changes to the file, and merging to reach eventual consistency.
The system should not require a complete history of changes, but keep enough versions of the data to facilitate the 3-way merging used in Git. With 3-way merging, you use the two recent conflicting versions, and compare to a common ancestor. The common ancestor is a copy of the file at the point the two branches diverged.
This approach worked well. I was able to come up with some fairly straightforward rules for which versions of the file I needed to keep around in order to fulfill a merge. All of this is implemented in BranchedFile. Agenda has been using this now for several years whenever two or more people want to collaboratively edit a note.
I hadn’t looked much at that code for several years, but that changed early in 2024. I attended the inaugural Local-First Conf in Berlin. I gave a short talk about Ensembles, which is the Core Data sync framework I have developed for more than 10 years ago, and then I watched the other talks. And I got inspired, and started to wonder: what if I could make my BranchedFile type more generic, and perhaps even turn it into a genuine modeling framework, like a mini version of SwiftData.
I started to dream:
It should use structs instead of classes
It should track changes in branches, and have 3-way merging
It should be possible just to store data with Codable
Where merging is an afterthought in many data modeling frameworks, this framework should support advanced merging, employing the latest Conflict-free Replicated Data Types (CRDTs)
It should be possible to sync via iCloud and other cloud services with no change to the model
It should be useful not only for sync, but even for subsystems within an app on a single device
Today the dream has been fulfilled, at least up to the point of an MVP.
Today, I’m launching Forked, a new approach to working with shared data in Swift. And it has actually worked out better than I expected. I wasn’t even sure it would be possible to build, but with the new Swift macros, I was able to come up with a minimal API that seems to work great. I’m really looking forward to dog fooding it.
Let’s just finish up with a little code, so you can see how simple it turned out to be. Here’s a model from the Forkers sample app, which is basically a basic contacts app:
@ForkedModel
struct Forkers: Codable {
    @Merged(using: .arrayOfIdentifiableMerge)
    var forkers: [Forker] = []
}

@ForkedModel
struct Forker: Identifiable, Codable, Hashable {
    var id: UUID = .init()
    var firstName: String = ""
    var lastName: String = ""
    var company: String = ""
    var birthday: Date?
    var email: String = ""
    var category: ForkerCategory?
    var color: ForkerColor?
    @Merged var balance: Balance = .init()
    @Merged var notes: String = ""
    @Merged var tags: Set<String> = []
}
What I love the most about Forked models is that they are just simple value types. The @ForkedModel macro doesn’t change the properties at all, it just adds some code in an extension to support 3-way merging. So you can use this on any struct, and the result can do everything your original struct could do, from encoding to JSON, to jumping seamlessly between isolation domains in Swift 6.
The merging that @ForkedModel provides is pretty powerful. It does property-wise merging of structs, and if you attach the @Merged attribute, you can add your own custom merging logic, or use the advanced algorithms built in (like CRDTs).
To give an example, the notes property above is a String. With @Merged applied, it gets a hidden power — it can resolve conflicts in a more natural way. Rather than discarding one set of changes, or merging to give somewhat arbitrary results, it produces a result a person would likely expect. For example, if we begin with the text “pretty cool”, and change the text to “Pretty Cool” on one device, and to “pretty cool!!!” on another, the merged result result will be “Pretty Cool!!!”. Nuff said.
And this works within your app’s process, between processes (eg with sharing extensions), and even between devices via iCloud.
Also worth noting: Forked models work great with Swift 6 structured concurrency, helping to avoid race conditions. When there is a chance you might get a race condition (eg due to interleaving in an actor), you can setup a QuickFork — equivalent to an in-memory Git repo — and use branches (known as forks in Forked) to isolate each set of changes, merging later to get a valid result.
To finish off, consider this: With your model supporting 3-way merging, it knows how to merge itself. All it needs is a conflicting version, and a common ancestor, and Boom! So adding support for CloudKit to your app is next to trivial, and your model can remain completely unchanged. Here is the code that Forkers uses to setup CloudKit sync:
let forkedModel = try ForkedResource(repository: repo)
let cloudKitExchange = try .init(id: "Forkers",
    forkedResource: forkedModel)

// Listen for incoming changes from CloudKit
Task {
    for await change in forkedModel.changeStream
        where change.fork == .main &&
              change.mergingFork == .cloudKit {
        // Update UI...
    }
}
That’s all of it! We just added sync to our app in less than 10 lines of code. Decentralized systems can sometimes be astounding, and they also work great even when your use case is not technically decentralized!
And so we arrive at the final station. This series on replicating types in Swift ends with this post. I will no doubt revisit various aspects of replicating types in other posts, but we are closing out the series proper here.
To recap, we have moved through Conflict Free Replicated Data Types (CRDTs) from the perspective of a Swift app developer, beginning with what they are and why they are useful, the mathematical features they must possess, the tricks and tools you can use to build them, and finishing with a series of posts on different types of CRDTs, from basic register types that are well suited to simple atomic properties, up to more complex array and dictionary types capable of recursive merging.
In this post, I’ll bring all of this together into a real world app. We won’t concentrate on details of SwiftUI or Combine, which are used throughout the app, but the code is there if these aspects intrigue you. Instead, the focus will be on model and data handling.
The app in question is a distributed data, note taking app. Unlike an app like eg Slack, which are built around a central server, this app allows edits to be made on any device, even if you are offline for days. Even better, when changes are synced up, edits get merged together in ways that seem logical to the user. When you make two different spelling corrections to the same note on two different devices, both corrections will survive the sync.
Introducing Decent Notes
Our decentralized app has to have a name; in line with the focus of this site, and the wholesome goodness of all Swift developers, the only name that fit was “Decent Notes”. It’s a simple enough app with some somewhat perplexing features that have been introduced purely for the educational purpose of accentuating the usage of the replicating types in our toolkit.
Of course, Decent Notes allows you to add and delete notes, and reorder them. In the note editing screen, you can set a title, and edit the note’s text, but you can also set a note priority, and choose from a few fixed tags, such as “Work” and “Home”.
Decent Notes allows you to add, remove and reorder your notes, and add a title, priority and some tags.
Each of these features is backed by an appropriate replicating data type. A title, which can be treated as a single atomic string, will be handled differently to the body of note content, where we want edits to be merged when they happen concurrently. We’ll choose replicating types appropriate for our goals in each case.
Running Decent Notes Yourself
The source code is available on GitHub. The app uses CloudKit to transfer data between devices. To build your own copy, you need to change a few things:
Change the app bundle id to one in your own App Store Connect account (egcom.mycompany.decentnotes).
Go into the Capabilities tab of the app target, and make sure that iCloud is active, with CloudKit checked, and set the container identifier there (egiCloud.com.mycompany.decentnotes).
Finally, locate the source file AppStorage.swift and, in the function makeCloudStore, replace the existing iCloud container with the one you just set.
To build and run Decent Notes, first update the bundle id and iCloud container to work with your App Store Connect account.
A Decent Note
The goal is to build up a model for Decent Notes out of replicating types, such that the model itself is effectively one big replicating type. To keep things simple, we will just store all data for all notes in one file, and sync it to CloudKit as a single file. In a shipping app, you would have to think more about how to partition the data into smaller chunks, to reduce the memory footprint, and the transfer load to and from the cloud.
The main model type is the Note.
struct Note: Identifiable, Replicable, Codable, Equatable {

    enum Priority: Int, Codable {
        case low, normal, high
    }

    enum Tag: String, Codable, CaseIterable {
        case home, work, travel, leisure
    }

    var id: UUID = .init()
    var title: ReplicatingRegister<String> = .init("")
    var text: ReplicatingArray<Character> = .init()
    var tags: ReplicatingSet<Tag> = .init()
    var priority: ReplicatingRegister<Priority> = .init(.normal)
    var creationDate: Date = .init()
Two of these properties are not like the others. Notice that id and creationDate don’t seem to be replicable at all. In actual fact, they are, because immutable types can replicate by default. When you create a new note, the two properties are set, and they never change again. They are simply copied. Merging constant properties is trivial, because the merging values should always be the same.
I’ve chosen to use a register for the title. This will mean changes are atomic — there will be no partial merging. One of the two merged values will always win, and changes made in the other will be discarded. For a simple string like a title, this is acceptable. If it is important to your app to allow partial merges, you could use a ReplicatingArray for the title, just as for the content text, with the knowledge that there is a cost to that in data size.
The main text of the note is built on the ReplicatingArray, with Character as the element type.
var text: ReplicatingArray<Character> = .init()
We want to allow simultaneous edits to be merged in a logical way for the user. This approach would even work for a multiple user, collaborative text editor like Google Docs.
The tags and priority properties have been included mostly for educational purposes.
    var tags: ReplicatingSet<Tag> = .init()
    var priority: ReplicatingRegister<Priority> = .init(.normal)
The tags demonstrate how you could use a replicating set type. You can add and remove tags on different devices, and have those partial changes merged together, rather than one set of changes overriding the other, as would be the case with a register type.
The priority is different. For that, we do want an atomic outcome. If you chose a priority of 1 on your iPhone, and 2 on your iPad, we don’t want the merged result to be 1.5. No, one of the two has to win. It has to be an atomic outcome, and a register is appropriate for that.
A Decent NoteBook
The other part of the model is the NoteBook. This is what contains the collection of notes.
This code is complicated a little by the use of a versionId. This is just a UUID that is changed every time an edit is made. The purpose of it is simply to quickly identify if a change has been made since the last time we synced, so we can determine if an upload is needed. If we compare the current versionId to the one we know is in the cloud, we know if the data needs to be uploaded again or not.
There are two main properties used in NoteBook. The first is a replicating dictionary which holds the actual notes: notesByIdentifier. To track the order of notes, so we can support manual sorting and moving, we have the orderedNoteIdentifiers replicating array.
I can hear some of you protesting from here: “Why not just put the notes in a replicating array, and you are done?”. The problem is that the array type doesn’t understand identity. If we made changes to a note, and updated the array, it would effectively save it as a new note, deleting the original one. We would lose all the advantages of partial merging that CRDTs provide.
As we saw in an earlier post, the ReplicatingDictionary type has the nice property that when the values are themselves Replicable, corresponding entries will get properly merged. This is essential to having our decentralized notes syncing up how the user expects them to.
Decent Syncing
The CloudStore.swift file does the heavy lifting of uploading the data to CloudKit, and downloading what other devices have uploaded. The code uses Combine heavily, and we won’t go into it. You can read a little about it here, and perhaps I will cover it in more depth in other posts. For now, we just take for granted that it will do its job properly.
When data is downloaded by the CloudStore class, it informs the DataStore object, which unpacks it using a JSONDecoder, and then merges the remote data with the local.
That is simple enough. It is saving the version id we discussed earlier, then merges and saves the local noteBook with that from the cloud.
The merging code of the NoteBook type is the devil in the details.
    func merged(with other: NoteBook) -> NoteBook {
        var new = self

        new.notesByIdentifier = notesByIdentifier.merged(with: other.notesByIdentifier)

        // Make sure there are no duplicates in the note identifiers.
        // Also confirm that a note exists for each identifier.
        // Begin by gathering the indices of the duplicates or invalid ids.
        let orderedIds = orderedNoteIdentifiers.merged(with: other.orderedNoteIdentifiers)
        var encounteredIds = Set<Note.ID>()
        var indicesForRemoval: [Int] = []
        for (i, id) in orderedIds.enumerated() {
            if !encounteredIds.insert(id).inserted || new.notesByIdentifier[id] == nil {
                indicesForRemoval.append(i)
            }
        }

        // Remove the non-unique entries in reverse order, so indices are valid
        var uniqueIds = orderedIds
        for i in indicesForRemoval.reversed() {
            uniqueIds.remove(at: i)
        }
        new.orderedNoteIdentifiers = uniqueIds

        return new
    }
This is more code than I would like. In theory, this could be reduced down to two simple calls to the merged function, like this…
    var new = self
    new.notesByIdentifier = notesByIdentifier.merged(with: other.notesByIdentifier)
    new.orderedNoteIdentifiers = orderedNoteIdentifiers.merged(with: other.orderedNoteIdentifiers)
    return new
So what’s the problem? Why can’t we have our 4 line merging function?
When ReplicatingArray is Indecent
The problem really comes down to using a ReplicatingArray to track the sort order. As already mentioned, the array type doesn’t have any concept of identity, so there are situations where seemingly straightforward edits can lead to duplicate entries.
To see how, imagine we begin with the array of identifiers fully synced up on two devices. On the first device we then move the first Note to the second position, and — at the same time — we do the same on the other device. The ReplicatingArray records these changes not as moves, but as deletions and insertions. Both devices will record the deletion at the first location, and then will insert a new entry. The problem is, because they each create their own insertion, after things are synced, the identifier of the moved note will be duplicated.
A ReplicatingArray has no concept of identity. A move is achieved by removing an element, and inserting at another location, but this can lead to duplicate copies.
We have used the ReplicatingArray because it is the only ordered type we have in this series, but we would be much better off with a ReplicatingOrderedSet. Such a type could be developed along the lines of the ReplicatingDictionary, and would properly handle identity of entries.
Without a ReplicatingOrderedSet, I have opted instead to use the ReplicatingArray, and to explicitly check for duplicates after a merge. Most of the merge code is there to remove the duplicated entries, and checks consistency with the dictionary of notes. With the right data type at hand, this extra code would not have been needed.
That just leaves the code for merging the Note values themselves. This is trivial. It simply goes through the properties, merging each one.
I mentioned in the beginning that Decent Notes utilizes SwiftUI, and that we wouldn’t be looking into that aspect. That is mostly true. I want to detour a little to consider how we deal with edits in the text editor, to demonstrate that integrating replicating types is not always the same as when you are using standard types.
The problem is that the SwiftUI TextEditor view expects to work with a String. In particular, it uses a binding to a string to get and set its contents. Our model, on the other hand, has a ReplicatingArray<Character>, and expects to be updated with insertions and deletions of characters.
What we don’t want is to simply set the model to the new string every time it changes. This will generate a lot of data, because the ReplicatingArray stores a complete history of edits. It would also mean we will not get any meaningful merging of our replicas — they would behave atomically, like a register.
The trick is to include a bindable string for the TextEditor, but instead of just storing the new string directly in our model, we determine what changed, and apply those changes to the ReplicatingArray.
struct ReplicatingCharactersView: View {
    @Binding var replicatingCharacters: ReplicatingArray<Character>
    private var modelText: String { String(replicatingCharacters.values) }

    @State private var displayedText: String = ""

    var body: some View {
        TextEditor(text: $displayedText)
            .border(Color(white: 0.9))
            .onAppear {
                updateDisplayedTextWithModel()
            }
            .onChange(of: replicatingCharacters) { _ in
                updateDisplayedTextWithModel()
            }
            .onChange(of: displayedText) { _ in
                updateModelFromDisplayedText()
            }
    }
Note the .onAppear and .onChange modifiers; those blocks are called when the text editor first appears, and when properties change. We use these moments to see what changes we need to make in the model.
The functions that get called to establish what changed use the String.difference method to establish what is different between the new string, and the one that is already in the model. The differences are then applied to the model.
    private func updateDisplayedTextWithModel() {
        let modelText = self.modelText
        guard displayedText != modelText else { return }
        displayedText = modelText
    }

    private func updateModelFromDisplayedText() {
        guard displayedText != modelText else { return }
        let diff = displayedText.difference(from: modelText)
        var newChars = replicatingCharacters
        for d in diff {
            switch d {
            case let .insert(offset, element, _):
                newChars.insert(element, at: offset)
            case let .remove(offset, _, _):
                newChars.remove(at: offset)
            }
        }
        replicatingCharacters = newChars
    }
Finishing Up
That’s all folks! In this series, we’ve seen how you can design and create your own replicating data types, and combine them to into full distributed data apps. These types have a data cost, but the payoff is that they make syncing more powerful and easier to implement. They also free your app from lock in — you can sync via any cloud service, and even peer-to-peer.
Where to from here? Start building apps with replicating types. Develop your own types as needed — it’s really not that difficult. In short, go forth and replicate!
In our continuing series on Conflict-Free Replicated Data Types (CRDTs) in Swift, we have so far introduced a number of types, beginning with the very basic register type, and working up to multi-value containers like sets and dictionaries.
Now we are ready to introduce the most advanced type in the whole series. It is a replicating type that brings order — literally. Unordered collections are one thing, but arrays are at a whole other level. Maintaining order (pun fully intended!) in replicated copies of an array is a challenge, and we will need to pull out all stops to win this one.
Approaches to Capturing Order
During our journey so far, we have been introduced to a variety of tools and techniques that are very useful for building replicated types, and, in particular, for merging them in a deterministic way, leading to eventual consistency when all devices have synced up:
Data elements are uniquely identifiable.
Timestamps can be used to determine when changes were made, and “choose a winner” when merging.
Tombstones allow us to explicitly track removal and deletion.
To handle ordered containers, we will need more. We need a way to relate one element to the next. On a single device, this could be achieved with indexes, like in a standard array, but this doesn’t suffice in a distributed data scenario, because the element of a given index on one device may reference a completely different element on another device. Indexes are fragile, and we need something more supple.
Priorities, Priorities
One way you could introduce order into a type is by simply giving each element a priority. For example, if you use a floating point number as the priority, and sort the elements based on that priority, you have a way to determine order when merging changes made on different devices.
There are a few caveats. For example, you need a deterministic way to handle ‘collisions’, where the same priority is introduced for different elements by edits on two separate devices. But there are ways to deal with this. In fact, we use this exact approach to order the paragraphs in the note taking app Agenda.
We won’t use priorities in this case. The ultimate goal here is to use the replicating array as the basis of a text editor. The priority-based approach doesn’t lead to very pleasant results when merging strings. For example, if you enter “cat” on one device, and “dog” on the other, the merged result is unlikely to be “catdog”, but “cdaotg”. In other words, elements tend to interleave, instead of being logically grouped by edit. We need something a bit more fancy to achieve this.
Not a Linked List, a Linked Tree
In Computer Science 101, you no doubt learned that a linked list can be a useful way to store ordered values. A list has the advantage that it doesn’t use indexes, which we concluded above are quite fragile in a distributed data system.
But a list also doesn’t merge together very easily after being modified separately on two devices. We need something like a list, with the same advantages, but more easily merged together.
A tree is a generalized list. Where elements in a list each have at most one following element (child), an element in a tree may have more than one following elements (children). If we represent our replicating array internally as a tree, it is not so difficult to merge changes, because we can simply combine the children.
Our Tree in Pictures
A picture tells a thousand words, so here come 4000 words worth of pictures to explain how it will work.
Imagine first that we represent our string as a tree of characters. Each character has a pointer to the previous character, which we will call its ‘parent’ or ‘anchor’. Suppose there are two devices, and the user types in the letters “THEAT” on Device A. You get a chain of letters like in the diagram below. Once the text is typed, assume the replicated array is copied over to Device B, and is now ready to be edited simultaneously on the two devices.
The text “THEAT” is typed on Device A, and is transferred to Device B.
Our user — or two separate users if the app is a collaborative editor — now edits the text separately on each device, without an interceding merge. We call this a concurrent edit.
On Device A, the user enters a “C” after the “E”. The parent of the new character is the “E”, so we end up with a small branched tree, as shown to the left of the diagram below.
Concurrent edits are made on Device A and B.
On Device B, the user enters the characters “R” and “E” at the end of the string, again forming a simple tree. (Technically, by adding the characters at the end, the tree on Device B is still a linked list, but that is coincidental.)
We have arrived at the moment of truth. Can we merge these two structures back together and get a sane result for our text editor? All we have to do is combine all the children of each node, to form a new tree.
Trees from Device A and B are merged together.
To get back the string to show to the user, we use a depth-first traversal. When we have a node with more than one child, we choose the newest child, and get all the elements from that subtree. Then, we get all the elements of the subtree of the next child, and so forth. Applying this approach at every node leads to a depth-first traversal.
The diagram above shows that the resulting string is what the user would probably expect. The “C” is in the right place, and the “RE” is at the end. But we aren’t quite finished. What happens when a character is deleted? Do we just remove the corresponding node? No, we can’t do that, because that would also disrupt all the children of the deleted node. They would no longer be attached.
What we will do instead is make use of an old friend: the tombstone. We will keep the deleted node around, and simply mark it as having been deleted. It’s children can stay attached, and be traversed just as if the tombstone was a standard parent node. The only change is that we don’t include the tombstone character in the string we show to the user — we hide it.
Tombstones represent deleted entries, and are hidden in the array.
The diagram above shows how we would handle deleting the last “T”. It is marked as a tombstone — shown here as a black square — and is not included in the final string. Instead of “THECATRE”, the user sees “THECARE”.
Introducing ReplicatingArray
It should be clear that the ReplicatingArray type is going to be more complex than the other types we have developed so far. We have to come up with a tree structure, and functions that can merge copies, and traverse the tree to build the final array. You can find the result, as usual, in the GitHub repository of this series.
The nodes in the tree are represented by the internal ValueContainer type.
public struct ReplicatingArray<T> {

    fileprivate struct ValueContainer: Identifiable {
        var anchor: ID?
        var value: T
        var lamportTimestamp: UInt64
        var id: UUID = UUID()
        var isDeleted: Bool = false

        ...
This private type is similar to types used for other containers (eg sets). There is a Lamport timestamp, which is needed to order the children of a node when traversing. The id is very important, because that is used as the pointer for referencing the parent — it is how we build up the tree. The isDeleted flag is set to true for a tombstone, and false otherwise.
The one new property is the anchor. This is the id of the parent node. It is optional, because a node at the start of the string has no parent.
The current values are stored in the property valueContainers in the correct order. This makes it easy to access the values on basis of index, as well as to quickly insert or delete an element. Ultimately the type has to work like an array, and this choice makes working with indexes simplest.
    private var valueContainers: Array<ValueContainer> = []
    private var tombstones: Array<ValueContainer> = []
Tombstones are stored separately, in the tombstones array. If we included them in valueContainers, the indexes would not correspond to the indexes in the array of values the user works with.
The choice to split the tombstones out into separate storage makes many methods simple to implement. For example, accessing the values is just a simple map, and the count even simpler.
    public var values: Array<T> { valueContainers.map { $0.value } }
    public var count: UInt64 { UInt64(valueContainers.count) }
Mutating ReplicatingArray
Inserting and appending values is also quite straightforward. A new value container is created, and inserted directly into the valueContainers array at the index passed.
What is involved in making that new value container? The usual suspects, such as incrementing the Lamport count, but we also need to make sure we setup our tree. We get the existing value container at the index, and use that as the parent. It’s id is set as the anchor of the new value container.
    private func makeValueContainer(withValue value: T, forInsertingAtIndex index: Int) -> ValueContainer {
        let anchor = index > 0 ? valueContainers[index-1].id : nil
        let new = ValueContainer(anchor: anchor, value: value, lamportTimestamp: lamportTimestamp)
        return new
    }
Removing elements is similarly straightforward. We set the isDeleted attribute, move the value container to the tombstones array, and remove it from valueContainers.
This is all quite simple. So where is the complexity? Most of it is pushed into the merge function. It begins by gathering together tombstones, and making sure there are no duplicates.
    public func merged(with other: Self) -> Self {
        let resultTombstones = (tombstones + other.tombstones).filterDuplicates { $0.id }
        let tombstoneIds = resultTombstones.map { $0.id }
Then we create an unordered set of the non-tombstone containers. In doing this, we filter out any containers that are in the new tombstone array created above.
        var encounteredIds: Set<ValueContainer.ID> = []
        let unorderedValueContainers = (valueContainers + other.valueContainers).filter {
            !tombstoneIds.contains($0.id) && encounteredIds.insert($0.id).inserted
        }
Now that we have a set of undeleted values, we have to order them.
        let resultValueContainersWithTombstones = Self.ordered(fromUnordered: unorderedValueContainers + resultTombstones)
        let resultValueContainers = resultValueContainersWithTombstones.filter { !$0.isDeleted }
And finally we are ready to prepare a result ReplicatingArray, setting the arrays we have built up.
        var result = self
        result.valueContainers = resultValueContainers
        result.tombstones = resultTombstones
        result.lamportTimestamp = Swift.max(self.lamportTimestamp, other.lamportTimestamp)
        return result
Traversing the Tree
Wait a minute…that didn’t look so difficult. Was there some sleight of hand? Well, a bit, yes. The complexity is actually all in that Self.ordered(fromUnordered:) function. It probably looks like it is just doing a sort, but actually, it contains the whole tree traversal mentioned earlier. It goes through the elements in order, traversing the subtrees as described above.
It begins by sorting the value containers, and then builds up a dictionary so that we can quickly find the child containers for a given parent id. This will allow us to traverse into the children through the tree.
A nested function is called recursively to traverse subtrees, and adds any encountered value containers to the ordered result array.
        var result: [ValueContainer] = []

        func addDecendants(of containers: [ValueContainer]) {
            for container in containers {
                result.append(container)
                guard let anchoredToValueContainer = anchoredByAnchorId[container.id] else { continue }
                addDecendants(of: anchoredToValueContainer)
            }
        }
With the addDescendants function in place, all we have to do is call it on the first containers in the array, which are the ones that have an anchor that is nil. addDescendants will recursively call itself to build up the whole result array.
        let roots = anchoredByAnchorId[nil] ?? []
        addDecendants(of: roots)
        return result
Pros and Cons
That’s it. Not a trivial type, but also not impossibly difficult given it is doing some pretty advanced merging of distributed data edits.
The pros of this type should be clear enough from the description above. You can use it to allow concurrent edits to an ordered array, and have the resulting replicas merge in a neat way, particularly suitable for text.
What about the cons? Like other container types, it uses more and more memory as edits are made, because tombstones are never removed, and so accumulate over time. There is also the overhead of having a Lamport count, identifier, and anchor for each entry. In short, the usual suspects.
One More Time…
We are entering the home straight. All of our replicating types are ready to go. All we have to do now is put them together into a real app, and see if it flies. That’s what we will be doing next time — the really fun bit.
It’s an old chestnut that Swift developers love to sink their teeth into: Should you force unwrap optionals? Everyone has an opinion about it, and I’m going to state mine as clearly as I can — forcefully unwrap early and often.
Of course, this is just one opinion. We even disagree about it within our two man Agenda team, so there is probably not much hope for the world. But I want to explain when and why I think it is good to force unwrap, and give a recent real world example that demonstrates the cost of not doing it.
First, my reasoning. I think you should force unwrap in any situation where logic tells you that an optional simply cannot be nil. A standard example might look like this.
var count: Int?
count = 0
print("\(count!)")
Could count end up being nil in this case? Perhaps, through some strange memory corruption or solar flare. Do I want my app to continue to run if count is nil? No. To put it bluntly, that is cancer. The app would be in an undefined state, which may well be dangerous. I don’t want it deleting user data or causing any other havoc — it should just crash. I will be informed of the problem, and it can’t do any more damage.
But what is wrong with the softly, softly approach? Shouldn’t we be defensive here? Here is how you could do it.
var count: Int?
count = 0
if let count = count {
    print("\(count)")
} else {
    print("error!")
}
There are several problems with this. Firstly, it is more verbose, making it more difficult to read. Secondly, and even more importantly, it disguises developer intentions. It says to the next developer “count could conceivably be nil, so we will check for it”, even though it was clear to the original developer that it should never be nil in any well-defined circumstance. Lastly, where is the app at after this code runs? Who knows? The state is completely unclear.
So be assertive with forced unwrapping. If there is no case where the optional should ever be nil, force unwrap. But don’t force unwrap in cases where there is a valid situation in which nil could arise. If a foreseen error could lead to nil, that requires explicit handling.
I mentioned that I wanted to finish off with a recent real-world example. When Apple announced iOS 14 would ship, they only gave about a day’s notice, leaving most of us scrambling to get ready. For Agenda, we had done a lot of work on widgets, but we had never had them in a beta, or extensively tested on the device. That was planned for the week or so that we usually have following release of the Xcode GM, but before the new iOS is available. Alas, in 2020, that was a luxury we didn’t have.
So I merged our branches in Git, and uploaded the binary. Downloaded from TestFlight, and — you guessed it — the widgets were broken. It was just showing a placeholder, which I later learned is what you get when a widget crashes.
I dug into the code, and I found that the problem was an incorrect file path. I had been testing with a special development target, and hadn’t properly tested the production target. The faulty code was as follows:
let identifierSuffix = (Bundle.main.object(forInfoDictionaryKey: "AgendaIdentifierSuffix") as? String) ?? ".development"
It is attempting to get a string from the Info.plist, which it will then use in the aforementioned path, but I had forgotten to put the string in the Info.plist. That wasn’t the real crime though: As you can see, in the case of nil being returned, it tries to play it safe by falling back on the development target’s string.
This was bad. It meant the production app had the wrong path, so it crashed, but I didn’t see the crash until very late in the development cycle, even though it was there the whole time. And the cost? I probably wasted an hour or two uploading the binary, then sluthing the problem. “What’s an hour or two?” I hear you ask. Well, Apple were pushing us to submit our new widget feature so that Agenda could be considered for featuring. I don’t think two hours was enough to jeopardize that, but you never know. I’m sure the App Store is a madhouse on release day.
Here is how I think the code should have been written.
let identifierSuffix = (Bundle.main.object(forInfoDictionaryKey: "AgendaIdentifierSuffix") as? String)!
It is simpler, clearly stating that I am assuming the entry is in the Info.plist, and the widget only works if that assumption is fulfilled. If there is no entry in there, the widget is entirely useless, and should crash before causing more damage. And, with this code, it will crash early in development. I would have discovered the issue as soon as I tried to run a debug version, and fixed it long before it hit the App Store.
(Update: It has been pointed out that the last line of code is a bit convoluted. It would read better as
let identifierSuffix = Bundle.main.object(forInfoDictionaryKey: "AgendaIdentifierSuffix") as! String
That’s very true. I wanted to change the original code as little as possible, to stay on message. The point is the same: defensive coding did more damage than good, and an assertive force-unwrap would have been better.)
In the previous installment of this ongoing series on Conflict-Free Replicated Data Types (CRDTs) in Swift, I introduced you to tombstones and Lamport counts, in constructing a replicating set. This time we’ll take a similar approach for a more common data type: the dictionary or map.
The code for our ReplicatingDictionary will be quite similar to what we used in the ReplicatingSet, so I won’t focus too much on those repetitious aspects. Instead, we will look in detail at a new trick the dictionary type has up its sleeve: the ability to recursively merge whenever the values it contains are also of a replicating type.
This ability to compose new types out of existing replicating types is one of the strengths of the CRDT approach. We’ll see in a few posts from now that you can construct your app’s data model entirely out of replicating types — the whole model becomes one monstrous replicating type, and merging across devices becomes a single function call. Simple — and completely robust — sync.
Introducing the ReplicatingDictionary
As usual, you can find all the code from the series in this GitHub repo. The core of the dictionary type is very similar to the set type from last time.
public struct ReplicatingDictionary<Key, Value> where Key: Hashable {

    fileprivate struct ValueContainer {
        var isDeleted: Bool
        var lamportTimestamp: LamportTimestamp
        var value: Value

        init(value: Value, lamportTimestamp: LamportTimestamp) {
            self.isDeleted = false
            self.lamportTimestamp = lamportTimestamp
            self.value = value
        }
    }

    private var valueContainersByKey: Dictionary<Key, ValueContainer>
    private var currentTimestamp: LamportTimestamp
The data is stored in the valueContainersByKey dictionary, but instead of just storing the values directly, like in a ‘normal’ dictionary, we wrap the values in a struct with some extra metadata. The metadata in question is a Lamport timestamp, and an isDeleted flag, which gives us tombstone functionality.
Just as for the replicating set type, this metadata allows values modified on different peers to be merged in a deterministic way, so that each peer ends up with the same set of key-value pairs. The mechanics of the dictionary type are almost identical to the set type; the main difference is that the set is just storing values, and the dictionary is storing values and keys. Whereas last time the entries in the set were used as the keys of the storage dictionary, this time we have a dedicated key for that, and the values get boxed with the metadata.
The rest of the type is fairly straightforward. The main challenge is taking into account the tombstones. For example, here is the set block of the subscript func.
        set(newValue) {
            currentTimestamp.tick()
            if let newValue = newValue {
                let container = ValueContainer(value: newValue, lamportTimestamp: currentTimestamp)
                valueContainersByKey[key] = container
            } else if let oldContainer = valueContainersByKey[key] {
                var newContainer = ValueContainer(value: oldContainer.value, lamportTimestamp: currentTimestamp)
                newContainer.isDeleted = true
                valueContainersByKey[key] = newContainer
            }
        }
It begins by incrementing the Lamport timestamp, because the contents of the type are being changed. It then checks if the newValue being set is non-nil; if it is, it creates a new ValueContainer box, with the new timestamp and value, and puts that in the valueContainersByKey storage. If newValueisnil, the function looks to see if there is an old value already stored for the key, because if there is, it needs to be marked deleted. We don’t just remove the entry from valueContainersByKey, we update it with the isDeleted flag set to true.
Recursive Merging
The RecursiveDictionary type has a standard merge method very similar to the one in ReplicatingSet, but it has an extra string to its merging bow: an extra merge method specialized for the case when the value type is also Replicable.
Why would we want this? The standard merge treats values atomically. If two devices update the value for a given key at the same time, later — when they sync up — one of the two values will win. You can never get half of one value, and half of the other — it’s an atomic merge.
But what if it actually would be useful to partially merge the values? Imagine you have written a nice replicating type to store the first name and last name of a contact, and you store values of this type in a ReplicatingDictionary. With the standard merge, if the first name of a contact was edited on one device, and the last name on another device, the eventual result would not be correct. One of the two values would win, and either the first name or the last name would still be wrong. But if the merge func of the values themselves could be called, we could have our replicating name type properly integrate the two edits, and both names would end up correct.
The specialized merged method looks like this.
extension ReplicatingDictionary where Value: Replicable {

    public func merged(with other: ReplicatingDictionary) -> ReplicatingDictionary {
        var haveTicked = false
        var resultDictionary = self
        resultDictionary.currentTimestamp = max(self.currentTimestamp, other.currentTimestamp)
        resultDictionary.valueContainersByKey = other.valueContainersByKey.reduce(into: valueContainersByKey) { result, entry in
            let first = result[entry.key]
            let second = entry.value
            if let first = first {
                if !first.isDeleted, !second.isDeleted {
                    // Merge the values
                    if !haveTicked {
                        resultDictionary.currentTimestamp.tick()
                        haveTicked = true
                    }
                    let newValue = first.value.merged(with: second.value)
                    let newValueContainer = ValueContainer(value: newValue, lamportTimestamp: resultDictionary.currentTimestamp)
                    result[entry.key] = newValueContainer
                } else {
                    // At least one deletion, so just revert to atomic merge
                    result[entry.key] = first.lamportTimestamp > second.lamportTimestamp ? first : second
                }
            } else {
                result[entry.key] = second
            }
        }
        return resultDictionary
    }

}
The two valueContainersByKey get merged together with a reduce, just like in the other merged functions we have seen, but the details are a bit different. It is very important to take into account the tombstones. If either of the values is deleted, the method just reverts back to the standard merge algorithm, picking the one that is ‘most recent’. If the value exists in both copies of valueContainersByKey, and is not deleted, rather than picking one value or the other, it calls the merged method of the value itself, and stores the result.
                    let newValue = first.value.merged(with: second.value)
                    let newValueContainer = ValueContainer(value: newValue, lamportTimestamp: resultDictionary.currentTimestamp)
                    result[entry.key] = newValueContainer
The rest of the function is just taking care to increase the Lamport timestamp appropriately.
Using Recursive Merge
That’s how the ReplicatingDictionary works, but how do you use it? In particular, how do you use that recursive merging functionality? There’s no better place to find out than in the unit tests.
This test sets up two ReplicatingDictionary’s, which contain ReplicatingSet’s as values. We introduced the ReplicatingSet last time; because it also conforms to Replicable, the specialized merged function is used.
The set in the first dictionary just contains the value 1. The second dictionary has a set containing 3, 4, and 5, and is updated to also include 6. The two dictionaries get merged to form dictOfSetC, and the test shows that the value for key “3” contains 1, 3, 4, 5 and 6. In other words, it has merged the two sets together, rather than atomically picking the first or the second.
This recursive merging is very powerful, and it doesn’t just work with sets. You can put any replicating data type you like in the dictionary, and it will undergo partial merging. With this tool at our disposal, we can build up complex data models that sync up autonomously.
Next time…
We have one more replicating type to go before we are ready to build our distributed text editing app. Next time we will develop a replicating array — the most complex type we will encounter in this series. It will act as the textual engine of our collaborative editor.
Last time we introduced our first replicating collection, an add-only set. Although useful in some specific circumstances, it isn’t a generally applicable set type, because it can only grow — you can’t remove entries from an add-only set. In this post, we are going to build a more advanced set which is capable of handling removals.
But what you find below is designed to do more than just introduce a new collection type. It also introduces some important concepts and tools you can use for building other replicating types. In particular, we will see how you can handle deleted values, and meet a more robust way to track time.
Introducing the ReplicatingSet
The add-only set was simple, because it was really just a standard set with the removal functions…err…removed. The data storage was exactly the same as a Swift Set, and merging involved nothing more that taking the union of the two sets.
As we touched upon, the add-only set was incapable of handling removal, because it couldn’t distinguish between the case where an entry did exist and was removed, and that the entry was never added in the first place. This meant it was impossible to decide how merging should proceed.
To get around this, we will include some metadata in our type, and store it in a dictionary keyed by the values themselves. Here is what it looks like.
public struct ReplicatingSet<T: Hashable> {

    fileprivate struct Metadata {
        var isDeleted: Bool
        var lamportTimestamp: LamportTimestamp

        init(lamportTimestamp: LamportTimestamp) {
            self.isDeleted = false
            self.lamportTimestamp = lamportTimestamp
        }
    }

    private var metadataByValue: Dictionary<T, Metadata>
    private var currentTimestamp: LamportTimestamp
The Metadata struct includes a flag isDeleted. If this is set to true, we know that the value once did exist in the set, but has been removed. We call this a tombstone, because it acts as evidence that something did exist, but has since deceased.
Also included in the metadata is a timestamp, but it is no ordinary timestamp. I will discuss that aspect more below, but for now, just think of it is the time of the last change to that particular entry in the set.
Inserting Values
So how does the ReplicatingSet work? The initializers allow you to create an empty set, or one prepopulated by an array of entries.
You can insert entries in an existing ReplicatingSet just like you would the standard Set type
    @discardableResult
    public mutating func insert(_ value: T) -> Bool {
        currentTimestamp.tick()

        let metadata = Metadata(lamportTimestamp: currentTimestamp)
        let isNewInsert: Bool

        if let oldMetadata = metadataByValue[value] {
            isNewInsert = oldMetadata.isDeleted
        } else {
            isNewInsert = true
        }
        metadataByValue[value] = metadata

        return isNewInsert
    }
This function begins with a call to the tick function on the current timestamp; think of this as simply incrementing the time. We need to do this whenever something changes.
New metadata is then created with this timestamp, and that metadata is set in the metadataByValue dictionary. There is a little more code there to check if there was already a value in the dictionary, but that is purely needed so that we can return if the value was new or not.
Handling Removal with Tombstones
You can also remove entries.
    @discardableResult
    public mutating func remove(_ value: T) -> T? {
        let returnValue: T?

        if let oldMetadata =
            metadataByValue[value], !oldMetadata.isDeleted {
            currentTimestamp.tick()
            var metadata =
                Metadata(lamportTimestamp: currentTimestamp)
            metadata.isDeleted = true
            metadataByValue[value] = metadata
            returnValue = value
        } else {
            returnValue = nil
        }

        return returnValue
    }
Removing doesn’t actually remove anything from the metadataByValue dictionary, it just changes the metadata so that it becomes a tombstone. Again, the timestamp is updated first, and new metadata is created with the isDeleted flag set to true. The result is stored in the dictionary.
Accessing Values
The rest of the struct is straightforward. Each function has to be careful to account for tombstones. For example, to get all the current values, we have to filter them out.
    public var values: Set<T> {
        let values = metadataByValue
             .filter({ !$1.isDeleted })
             .map({ $0.key })
        return Set(values)
    }
The same is true when checking if a particular value is in the set. It is not enough to just check if the key exists in the dictionary; the isDeleted property of the metadata also needs to be taken into account.
As you know by now, replicating types are types where a value can be modified independently on different devices, and merged back together in a deterministic way. The ReplicatingSet is no different, and the algorithm used is much the same as that of the ReplicatingRegister. For each entry, the value with the latest time wins.
extension ReplicatingSet: Replicable {

    public func merged(with other: ReplicatingSet) -> ReplicatingSet {
        var result = self
        result.metadataByValue = other.metadataByValue.reduce(into: metadataByValue) { result, entry in
            let firstMetadata = result[entry.key]
            let secondMetadata = entry.value
            if let firstMetadata = firstMetadata {
                result[entry.key] =
                    firstMetadata.lamportTimestamp > secondMetadata.lamportTimestamp ? firstMetadata : secondMetadata
            } else {
                result[entry.key] = secondMetadata
            }
        }
        result.currentTimestamp = Swift.max(self.currentTimestamp, other.currentTimestamp)
        return result
    }

}
Note also that the currentTimestamp is also set to the largest of the two values before the merge. It is important that the timestamp keep increasing; if it were to decrease, we would risk losing more recent changes in future merges.
Pros and Cons
We’ve touched on the pros and cons of our new set type in passing above, but let’s address it head on. The big pro is of course that we can both add and remove values, like a real Set, and yet merge things back together consistently when changes are made on different devices.
On the negative side, we have had to introduce extra metadata, which takes up more memory and consumes network bandwidth. Even worse, because we have had to introduce tombstones, the data usage of the ReplicatingSet can only increase. Even when we do remove an element, it remains in the set as a tombstone — no memory is freed at all. Even a deleted item takes up space
Lamport Counts
Let’s finish off by addressing the handling of time, which I skipped over earlier. We could use standard timestamps for this, exactly like we did for the ReplicatingRegister, but there are some risks with that. For example, imagine your iPhone has some issues with the clock, and jumps forward a year for a few hours. No big deal, right? That depends on what you do in those few hours. Imagine you make significant changes in an app that is using standard Date values to merge data. Any changes you make will effectively be locked in for the next year. Any attempt to change those values after the clock recovers will fail, because the new timestamps will be smaller than the timestamps used during the glitch.
Some argue you can work around this type of issue with some ad hoc checks. For example, you could save the date occasionally, and if you see a large jump, you could warn the user and refuse to save changes. But what if someone puts a device in a drawer for a few months? In reality, it is quite difficult to correctly identify issues with the clock. Probably the best you can do is regularly check with a reliable time server, though even this will not help if the device is offline.
The ReplicatingSet uses a different approach: a Lamport count. It’s really very simple. A Lamport count is nothing more than an integer value that increases as each change is made. This is rock solid, in the sense that it doesn’t depend on the real time at all. Your iPhone’s clock could be completely messed up, and the Lamport count would be unphased.
The strength of the Lamport count is that it has no relation to the actual time, other than that it can only increase, just like real time. But that is also a weakness: When changes are made on different devices to the same value, you can determine a winner using the Lamport count, but there is nothing to say that the winning change was actually the most recent. As long as changes are made serially on a single device, the ordering is well defined, as the Lamport count will continually grow, but when changes are made concurrently on different devices, the winner is largely unpredictable, though importantly, completely deterministic.
The history of a single replicating value over time, with the corresponding Lamport count. It begins at the bottom, with a count of 0, and time evolves upwards. The color represents the value at any given moment. After the change made with a Lamport count of 1, concurrent changes are made on two different devices, and later merged again. You can see that the winning value after the merge is the one with the highest count, but it doesn’t correspond to the most recent change in this case.
Next time…
That’s it for sets. Next time we are going to move on to the Dictionary type, and see if we can apply a similar approach there. But we will go one step further, by making our dictionary type merge recursively. This opens up much more interesting possibilities, as we can start to build more complex replicating types out of simple building blocks.
In the last post I introduced you to the first replicating type in this series: a register. A register is a simple type, one that you may even have used yourself at some point, which keeps the most recent value that has been set, together with the timestamp of the update, so it can merge conflicting values from other devices. Even with this very simple type, you can develop complete distributed-data apps.
But there are limitations. A value in a replicating register can only be changed atomically. When it comes time to merge conflicting values, the register will choose one or the other, but cannot merge the two together. For example, if you stored a full name in a register, and edited the first name on one device, and the surname on another, the merged result would lose one of the two edits. Either the first name would be reverted, or the surname.
To go beyond atomic merging, we need to have new types that are capable of partial merging. Often, this means a collection. Collections can be added to, and removed from, on different devices, and the results merged at the element level, to give a combined result of the changes made on each device. Think about a collaborative editor like Google Docs. You can be editing some text at the same time as a colleague, and both edits will survive in the final document.
In this post, we will start our journey into collection types with the simplest of them all: the add-only set. It is so simple in fact, all you need to do to make one is remove one of the capabilities of the standard Set type…
The Add-Only Set
Imagine a Set where you can add new elements, but never remove them, and what you have is an add-only set. And the code is just as simple as the description
public struct ReplicatingAddOnlySet<T: Hashable> {

    private var storage: Set<T>

    public mutating func insert(_ entry: T) {
        storage.insert(entry)
    }

    public var values: Set<T> {
        storage
    }

    public init() {
        storage = .init()
    }

    public init(_ values: Set<T>) {
        storage = values
    }
}
The storage property holds the values in a standard mutable Set, which is kept private so that it can’t be changed from outside our replicating type. We then allow public access only to insert values, or retrieve all values, but not to remove values from the set.
You’ll recall from last time that a replicating type needs to have the ability to be merged with related copies of itself from other devices. Merging in this case just involves taking the union of the two copies of the set.
The union of the two storage sets is taken, and used to create a new add-only set, which is returned. Note that there is no tracking of timestamps, because there is no need: we don’t care when the values were inserted; once they are inserted, they are permanently in the set, and can never be removed — the add-only set can only grow.
Checking the Math
You should add unit tests for new replicating types, including tests for the three musketeers: associativity, commutativity and idempotency. I won’t got through these in detail here, but think about what they mean for a minute, and I am pretty sure you will see that it is self-evident that the add-only set conforms.
For example, the order of sets is unimportant when taking the union, so commutativity is a no brainer. And taking the union of two sets, and then taking the union of the result with either of the two original sets clearly changes nothing — idempotency is also a cinch.
How is this useful?
The add-only set is simple, but is it at all useful? What problems does it solve?
Clearly, it is not as powerful as a general purpose set which allows for removal, but there are situations where an add-only set can be used to good effect. In general, any time you are tracking a transactional history, this type is a good choice. It could be literal transactions, such as records in a banking system, or transaction-like values like entries in a log. If your values accumulate over time, don’t change once created, and are never removed, the add-only set will work great.
There are other types of replicating sets that can handle removal, so why would you ever choose the add-only set over those? The answer there is that an add-only set is very cheap. Recall that we didn’t have to save any timestamps, unique identifiers, or other metadata that was needed for the replicating register type. The space occupied by an add-only set is actually the same as that of a standard set. This makes it a cheap option for storage, and data transfer.
When nothing is something
To finish off, I want to address ‘nothing’. In particular, when ‘nothing’ is ‘something’. In the coming posts, this will become a recurring theme. It is typically one of the main challenges you need to solve when designing a replicating type — how do you represent nothing.
See, there are different types of nothing. There is the nothing you get when you create a new replicating value, and it is empty. And there is the nothing you get when you remove a value from a replicating type. The two are generally not the same.
How to represent and store the absense of a value in a replicating type is key to satisfying our mathematical requirements. In the add-only set, we solved this problem by simply excluding one type of nothing, namely, the one you get when you remove an element. With that option gone, if a value is not in our storage, we know it was never added.
Why a Swift Set is not a replicating type
As an exercise, let’s take a standard Swift Set, and run through some tests in our collective heads. Note that a standard Setdoes allow removal of elements. Imagine that we have two devices (A and B), with the same set of values on each. Then, on device A, a value is removed, and now device B has to merge that change in.
Device B sees that it has one extra value in its own copy of the set, but what does that mean? Did A remove that value, or did B add it since the last sync? There is no way to know, and that is all because there is no entry in the set to represent a removed entry.
When we start to look at more advanced types, we will see how you introduce something to represent nothing.
Next Time…
The add-only set is a very basic type, but does have its uses, is easy to implement, and cheap in terms of storage space and data transfer. If we want something that behaves more like a standard set, with removals, we need a more advanced collection. We will take a look at how you can do that in the next post.
When I first started reading about Conflict-Free Replicated Data Types (CRDTs), I expected a fertile new field of Computer Science dedicated to a whole new approach to managing data. I was soon somewhat disappointed, because everything I learned was accompanied by a generaous slather of déjà vu (yes, I Googled the accents). It felt like every replicating type encountered was already in widespread use. Heck, I had used half of them myself!
So CRDTs are not always new, but it is still good that they are being baptised and catagorized. It’s important to recognize patterns in solutions; it makes ideas easier to convey to others, gives a common language, and allows a new generation of types to be built up on the shoulders of existing ones.
Today we are going to look at a replicating type — our first in this series — that I am pretty sure you will have seen before in some way, shape or form. Your reaction may be to ask “How is that a CRDT when I already use it regularly?” Don’t get discouraged. There are more advanced types coming down the pipe, but walk before run you must.
The Replicating Register
Ask yourself what most people expect to happen when they make changes to the same data on two different devices. In nearly all cases, they would expect the most recent change to survive after the data is merged. In many apps, this is all the merge logic you need — last change wins.
What would a type that encapsulated this simple behavior look like? Well, like this
public struct ReplicatingRegister<T> {

    fileprivate struct Entry: Identifiable {
        var value: T
        var timestamp: TimeInterval
        var id: UUID

        init(value: T,
            timestamp: TimeInterval =
                Date().timeIntervalSinceReferenceDate,
            id: UUID = UUID()) {
            self.value = value
            self.timestamp = timestamp
            self.id = id
        }

        func isOrdered(after other: Entry) -> Bool {
            (timestamp, id.uuidString) >
                (other.timestamp, other.id.uuidString)
        }
    }

    private var entry: Entry

    public var value: T {
        get {
            entry.value
        }
        set {
            entry = Entry(value: newValue)
        }
    }

    public init(_ value: T) {
        entry = Entry(value: value)
    }
}
Aside from a few odds and ends, which we will deal with below, this code is the whole type. It’s really very simple: a ReplicatingRegister is a type that stores a value together with the timestamp at which the value was last changed.
The ReplicatingRegister is generic on the type of the value it contains. You can put any value you like in a register. Here is how you would create a register for an Int.
var a = ReplicatingRegister(5)
We can update the value like this
a.value = 6
and get the value out again like this
let number = a.value // number becomes 6
The Workings of a Register
You can see from the code above that the ReplicatingRegister contains a helper struct called Entry.
fileprivate struct Entry: Identifiable {
    var value: T
    var timestamp: TimeInterval
    var id: UUID

    init(value: T,
        timestamp: TimeInterval =
            Date().timeIntervalSinceReferenceDate,
        id: UUID = UUID()) {
        self.value = value
        self.timestamp = timestamp
        self.id = id
    }

    func isOrdered(after other: Entry) -> Bool {
        (timestamp, id.uuidString) >
            (other.timestamp, other.id.uuidString)
    }
}
Entry contains the actual value, but also a timestamp. When the value of the register gets set, a whole new Entry is created, with a new timestamp.
public var value: T {
    get {
        entry.value
    }
    set {
        entry = Entry(value: newValue)
    }
}
The isOrdered function determines which of two entries is most recent, which we will need when we come to merge registers a bit later.
Murphy’s Law and Unique Identifiers
You may be wondering why the Entry type includes a UUID identifier. It already has a timestamp, which is an identity of a sort. Isn’t that timestamp unique enough?
Maybe, but you will sleep better at night if you assume it is not unique enough. A timestamp has something like millisecond accuracy. A computing device can do thousands, even millions of operations in that time. Two changes to the same value on the same device may very well fall on exactly the same tick of the timestamp clock.
What would happen if we used the timestamp in isolation? If two changes collided — had the same timestamp — the ‘winner’ would effectively be random. Your devices could easily pick different outcomes, and your type will have diverged — your app is no longer in sync. To avoid this, we need some way to pick the same winner on all devices, even if the timestamps are exactly the same. For that, we add the UUID. It ensures a deterministic result in cases where the timestamps collide.
Merging Registers
There is one ability that all replicating types must have: merging with other replicas. We can capture this in a very simple protocol.
Merging two values of the same register simply involves picking the latest one.
extension ReplicatingRegister: Replicable {

    public func merged(with other: ReplicatingRegister) ->
        ReplicatingRegister {
        entry.isOrdered(after: other.entry) ? self : other
    }

}
It’s so simple, it probably should be forbidden. With just this type in your arsenal, you can build very robust distributed data applications.
Testing the Type
Writing unit tests for replicating types is generally pretty straightforward, because they are so self contained. Typically you add a few basic creation and update tests
final class ReplicatingArrayTests: XCTestCase {

    var a: ReplicatingRegister<Int>!
    var b: ReplicatingRegister<Int>!

    override func setUp() {
        super.setUp()
        a = .init(1)
        b = .init(2)
    }

    func testInitialCreation() {
        XCTAssertEqual(a.value, 1)
    }

    func testSettingValue() {
        a.value = 2
        XCTAssertEqual(a.value, 2)
        a.value = 3
        XCTAssertEqual(a.value, 3)
    }
Then you will want to test merging
func testMergeOfInitiallyUnrelated() {
    let c = a.merged(with: b)
    XCTAssertEqual(c.value, b.value)
}

func testLastChangeWins() {
    a.value = 3
    let c = a.merged(with: b)
    XCTAssertEqual(c.value, a.value)
}
And lastly, you should run through the mathematical requirements we discussed in the first post of the series: associativity, commutativity, and idempotency.
If you recall, merging is associative if it doesn’t matter how you group values. It should not matter if we merge register a with b, and the result with c; or we begin with b and c, and merge the result with a.
func testAssociativity() {
    let c: ReplicatingRegister<Int> = .init(3)
    let e = a.merged(with: b).merged(with: c)
    let f = a.merged(with: b.merged(with: c))
    XCTAssertEqual(e.value, f.value)
}
Commutativity of registers means that it doesn’t matter whether you merge a with b, or b with a.
func testCommutativity() {
    let c = a.merged(with: b)
    let d = b.merged(with: a)
    XCTAssertEqual(d.value, c.value)
}
And idempotency simply means that merging the same values multiple times has no effect on the outcome: you get the same answer as the first time you merge.
func testIdempotency() {
    let c = a.merged(with: b)
    let d = c.merged(with: b)
    let e = c.merged(with: a)
    XCTAssertEqual(c.value, d.value)
    XCTAssertEqual(c.value, e.value)
}
The Weaknesses of a Register
If registers are so simple, and you can build whole apps with them, why do we need other, more complex replicating types? Registers work fine for simple values that we want to change atomically. Numbers, simple strings, enums and the like, all work well with registers. All changes are atomic. We don’t want changes from one device ‘mixing’ with those from another, to give half the value from each. We want one of the changes to win outright.
But there are many cases where this is undesirable. Imagine you have someone’s full name. It would be a shame if you couldn’t edit the first and last names independently. The solution in this case could be as simple as using two different registers, but in other cases, even that may not suffice. Imagine you are developing a collaborative text editor. It would be very limiting if someone entering some text on one device caused all the changes made by someone on another device to be overridden and lost. In that situation, we want to combine the changes; we need a more sophisticated replicating type, capable of partial merges.
Conditional Conformance to Protocols
That covers the replication of registers, but there are a few other Swifty aspects you will probably want to include in your replicating types. For example, you may wish to make them conform to protocols like Equatable and Hashable. Of course, this will only work if the contained value also conforms to the protocol, so we use conditional conformance for this.
extension ReplicatingRegister: Equatable where T: Equatable {
}

extension ReplicatingRegister.Entry: Equatable where T: Equatable {
}

extension ReplicatingRegister: Hashable where T: Hashable {
}

extension ReplicatingRegister.Entry: Hashable where T: Hashable {
}
You need to be a bit careful here. It is very easy to confuse the equality or hashability of the contained value with that of the replicating type. They aren’t the same. It is possible that two replicas have the same value, but the replicas themselves are not equal, having been set on different devices with different timestamps. Keep clear in your head whether you want to test the whole state of the replicating type, or just the value it contains.
Codability
One of the more important conditional conformances for replicating types is the Codable protocol. Without a way to serialize the replicating types, we have no way to transfer them between devices for sync purposes. In most cases, it is trivial to add.
extension ReplicatingRegister: Codable where T: Codable {
}

extension ReplicatingRegister.Entry: Codable where T: Codable {
}
And a test confirms that it works as expected.
func testCodable() {
    let data = try! JSONEncoder().encode(a)
    let d = try! JSONDecoder().decode(ReplicatingRegister<Int>.self,
        from: data)
    XCTAssertEqual(a, d)
}
Property Wrappers
The ReplicatingRegister struct is so simple, you may be tempted to use it as a property wrapper. You could certainly do that, but I have avoided the urge, because the goal of property wrappers is to hide the enclosing type and have things just work as if it weren’t there. With replicating types, you often need to manipulate the type directly — it is not just a decorative shell around your data. This is even more the case with the advanced types we will meet later in the series. For this reason, I resist the urge to hide away the replicating type containers. They are first class citizens here.
Next Time…
That’s it. Your first replicating type! Simple really, but very powerful. Next time we will move to containers, and start to build replicating types for storing multiple values.


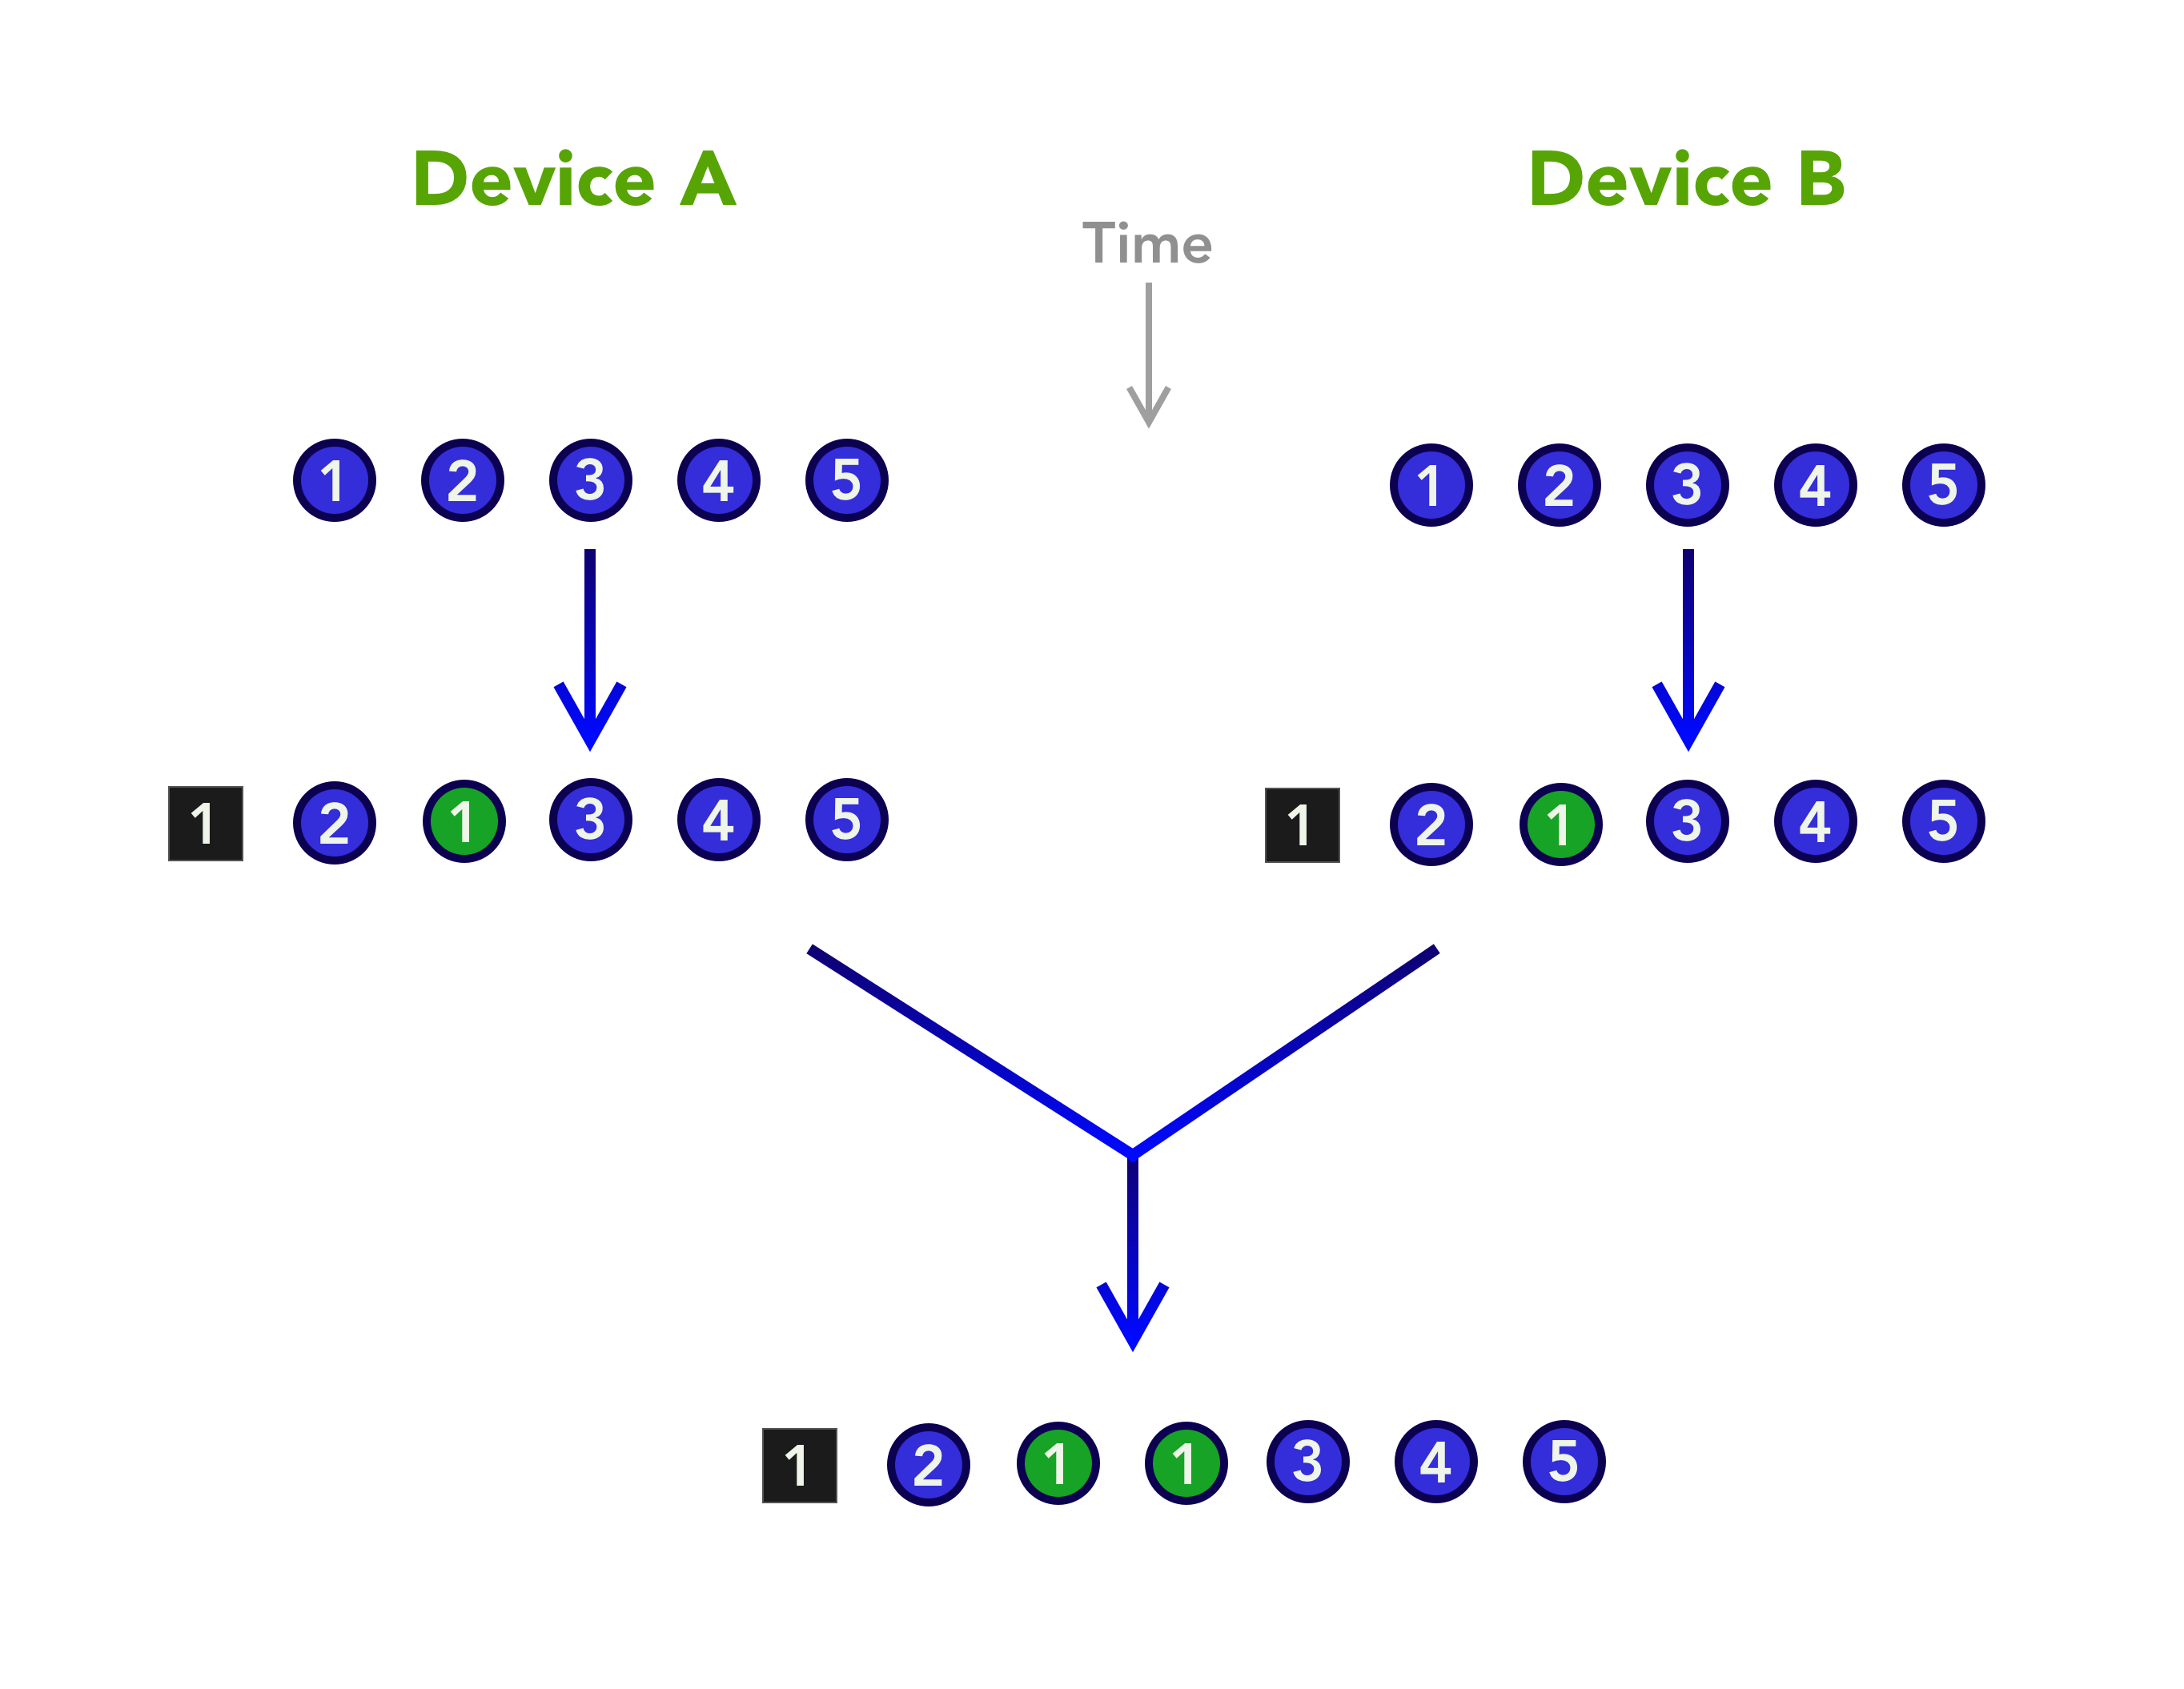


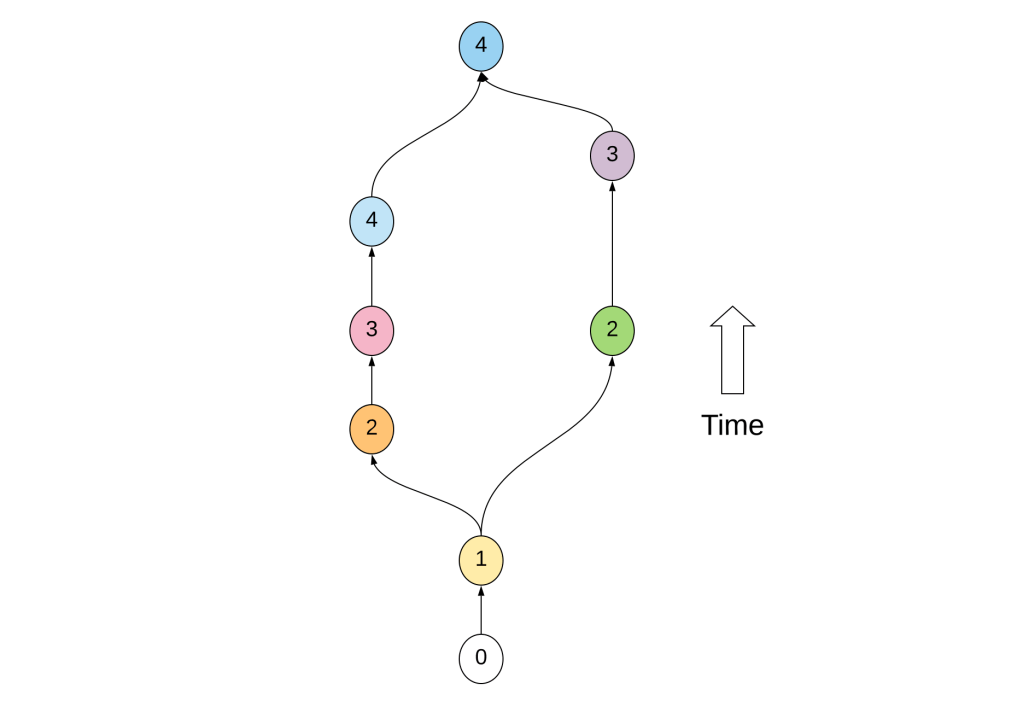

